Arc for XBMC is a remote control for XBMC featuring three advanced remote views:
- A gestural remote view allowing the use of finger swipes, flicks, and taps to control everything from fast forwarding to toggling the context menu
- A multi-touch trackpad view which allows gestures using up to 3 fingers at once. This is similar to the cursor control on most laptops.
- A standard remote view laid out like an Xbox DVD remote
Other Features:
- Use your iPhone’s keyboard for text entry
- Take a screenshot of the media you’re playing and without exiting the app:
- Post it directly to Twitter using Arc’s Twitter integration
- Email it to a friend
- Save it to your iPhone
- Can’t decide what to watch? Use the Media Picker, a slot machine style view where Arc makes the choice for you with a shake of your phone. Want to watch something from a specific genre or with a specific actor? Lock it in before shaking!
- Auto-Lock options which prevent the phone from locking during media playback
- Volume control slider in the gestural view (non pass through audio only)


***App requires an installation of XBMC which is available for download at http://www.xbmc.org
If you have any issues, comments, or suggestions please feel free to email us at support@twogear.com, use our contact form, or post in our forums.
XBMC Settings
Before you can use Arc, you must first enable a few network services in XBMC. These services include XBMC’s Event Client and Web Interface.
Follow these steps to enable the Event Client and Web Interface:
- Navigate to the Network Services Screen. From the main XBMC menu navigate to SYSTEM->NETWORK->SERVICES.
- Enable The Event Server. Make sure the ”Allow programs on other systems to control XBMC” option is selected. This will allow Arc to control XBMC utilizing the Event Server.
- Enable The Web Interface. Make sure the ”Allow control of XBMC via HTTP” option is selected. This allows Arc to retrieve extra information about the current state of XBMC. You may also set a Port, Username, and Password.
- Enable ZeroConf (Mac and Linux only). Make sure the ”Announce these services to other systems via Zeroconf” option is selected. This will allow Arc to automatically discover your installation of XBMC. If this option is not selected you will have to manually add your XBMC information into Arc. This option is only available on Mac and Linux versions of XBMC.
After you are finished, your settings screen should match one of the following screenshots depending on your operating system:
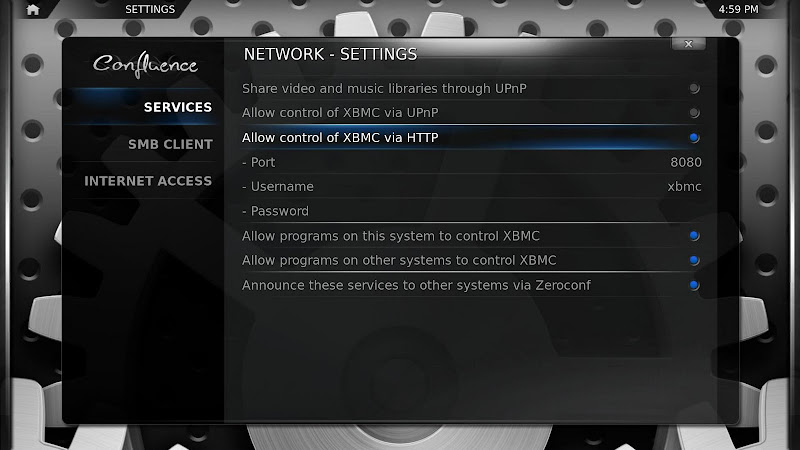
(Mac, Linux)
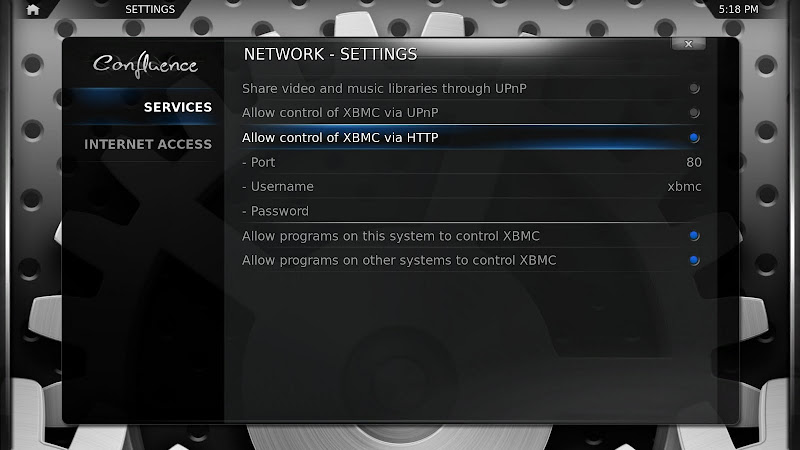
(Windows, XBOX)
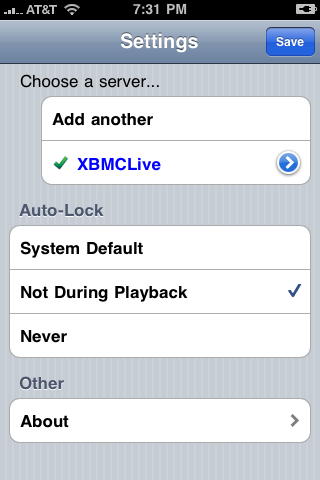
Adding an XBMC server to Arc
After the Event and Web Server have been enabled in XBMC, it can be added to Arc’s list of available XBMC servers. Arc can auto-detect XBMC server or you can manually enter the XBMC server information.
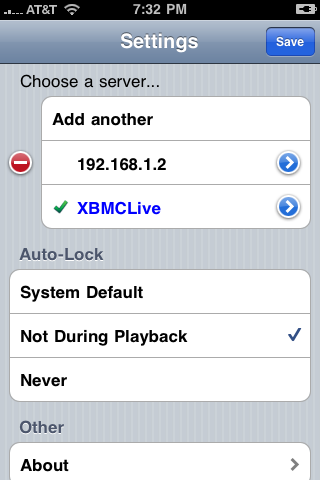
In order for Arc to auto-detect an XBMC server, Zeroconf must be enabled in XBMC’s network settings. This is only available on Mac and Linux. If Arc is able to automatically detect XBMC, it will be listed in the “Choose a Server” section of the settings menu. Simply select the server from the list and press save.
If Zeroconf is not available, you will have to manually add the XBMC server to Arc.
Follow these steps to manually add the XBMC server to Arc:
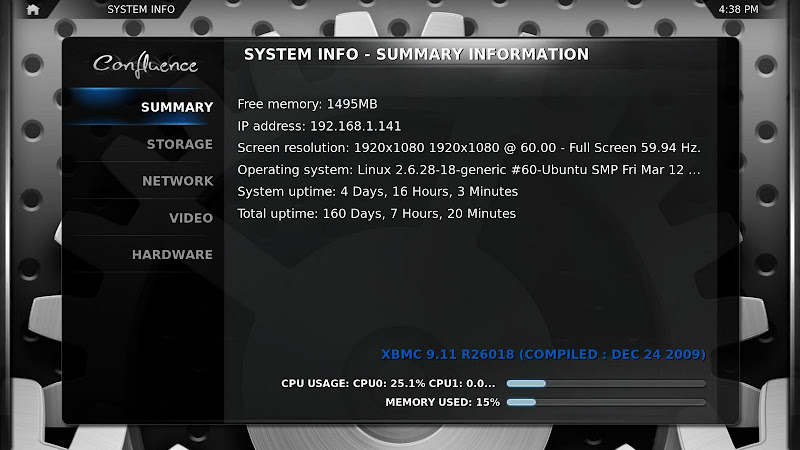
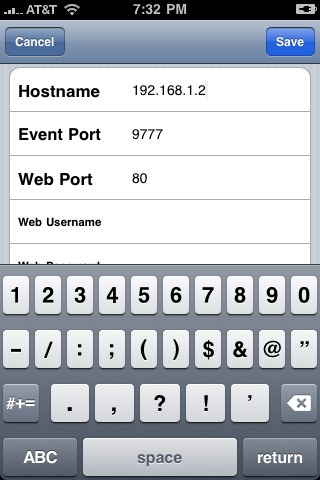
- Find out the IP address or hostname of your XBMC server. If you don’t know the IP address or hostname of your XBMC server, you can find this information on the System Info screen.
- Press the “Add another” option in the “Choose a server” section on the Settings page.
- Enter the information for the XBMC server into Arc and press save. ”Event Port” should be set to 9777.
- Select the newly added server from the server list and press save.